


Introduction
When working with Cascading Style Sheet(CSS), HyperText Markup Language(HTML) elements are presented as boxes carved around them. Therefore, In other to style HTML elements effectively, it is important to know how CSS sees and relates to the boxes.
This article will expose you to how the CSS box model works and how you can manipulate the boxes to get your desired design.
CSS Box Model
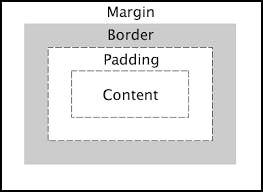
CSS approaches each HTML element as a separate box with four(4) different major parts which are;
- Content
- Padding
- Border
- Margin
The four major parts of a box are better represented in the image below;
The Content Area
The content area contains items like texts, images, and other forms of media content.
HTML file
<html>
<p>I am a paragraph box</p>
</html>
CSS file
p {
background-color: green;
height: 100px;
width: 100px;
}
The live output of the above snippet shows the content text, I am a paragraph, sitting in a box with the width and height of 100px. One thing to note is the way it is unstructured which is because its padding and margin values are yet to be specified.
The Padding Area
This area is the space around the content within the border of the box. The CSS properties provided to manipulate the padding area are;
- padding-top: This property affects the upper part of the padding area.
- padding-bottom: This property affects the lower part of the padding area.
- padding-left: This property affects the left side of the padding area.
- padding-right: This property affects the right side of the padding area.
Let's style the padding area of the box in our HTML file;
p {
padding-top: 20px;
padding-right: 10px;
padding-bottom: 20px;
padding-left: 10px;
}
The shorthand property for styling the padding area is the padding property and its values take the calculation of each area in a clockwise manner, that is, the value for padding-top will be stated first, followed by the value for padding-right, padding-bottom then finally value for padding-left. Here is an example;
 p {
  padding: 20px 10px 20px 10px;
}
The Border Area
This area comes immediately after the padding area. It separates the margin area from the padding area. The CSS property for the border which is the border-style specifies the width, colour and kind of style to display. The border-style property also affects all the sides of the box and its values include;
- dotted
- dashed
- solid
- double
- groove
- ridge
- inset
- outset
Let's style the border area of the box in our HTML file;
p {
border-style: solid;
border-color: blue;
}
styles and colours can also be applied to sides of the border differently by using the following property;
- border-top-style
- border-left-style
- border-right-style
- border-bottom-style
- border-top-color
- border-right-color
- border-bottom-color
- border-left-color
Here is a practical demonstration;
p {
border-top-style: dashed;
border-left-style: solid;
border-right-style: ridge;
border-bottom-style: groove;
border-top-color: grey;
border-right-color: white;
border-bottom-color: yellow;
border-left-color: red;
}
border property is used as the shorthand property for specifying the values for width, style and colour of the border. The value for width should come first, followed by the value for style then followed by the value for the colour. Here is a demonstration;
p {
border: 4px dashed red;
}
The Margin Area
This area is the space around the content outside the border of the box. The CSS properties provided to manipulate the padding area are;
- margin-top: This property affects the upper part of the margin area.
- margin-bottom: This property affects the lower part of the margin area.
- margin-left: This property affects the left side of the margin area.
- margin-right: This property affects the right side of the margin area.
Let's style the margin area of the box in our HTML file;
p {
margin-top: 20px;
margin-right: 10px;
margin-bottom: 20px;
margin-left: 10px;
}
The shorthand property for styling the margin area is the margin property and its values take the calculation of each area in a clockwise manner, that is, the value for margin-top will be stated first, followed by the value for margin-right, margin-bottom then finally value for margin-left. Here is an example;
For example;
 p {
  margin: 20px 10px 20px 10px;
}
Let's Style Using Shorthand Properties and Values
p {
height: 100px;
width: 100px;
background-color: grey;
margin: 20px 10px 20px 10px;
padding: 30px 20px 30px 20px;
border: 5px solid blue;
}
The major difference between our live output and the first live output we had at the beginning of the article is in the box structure and layout.
Conclusion
The understanding of the CSS box model will help you to change the default behaviour of the layout of each HTML element to your desired layout which will make your webpage look more structured, organized and attractive.
I hope you found this article useful, share your views in the comment section and connect with me on Twitter@JoyPaces